Translate

Wednesday, April 23, 2014

Sunflower Glasses À La Pier One

Hello!  Thank you for popping in to my blog!  

The Spring has graciously decided to stay here in California, at long last!  Retailers are always ahead of the game, and have already begun displaying Summer wares.  On a recent browsing, I came across these adorable flutes at Pier One.

I liked them, but $8.95 per glass seemed a bit pricey, especially when I usually buy my glasses in sets of ten or twelve at a time.  These would likely only be used during Summer.....needless to say, I walked away without them.  

Well, those darned glasses kept niggling at me in the back of my mind, so it was a couple of days later when I hopped online. I did a quick search of Pier One Floral Glasses, because I couldn't remember the name of the particular glass.  When I did, these came up. 


I liked these glasses even more than the first, and they fit perfectly with the Tablescape theme I had begun planning, yet these were even more at $10 each.  I decided I could accomplish a similar knock-off much more inexpensively.  Here is my process.    

You will need:
Flutes
Yellow paint
Orange paint
Green paint 
Paint brushes, one large one small


I decided to use these faux sunflowers as an inspiration, knowing I'd be using them in my tablescape.


I began by using the larger brush to paint petals.  Allow dry time.


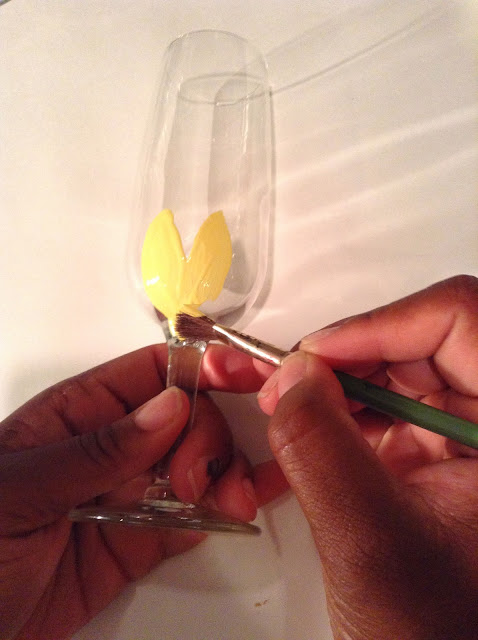
Next, I painted the stems of the glasses in forest green. Allow dry time. 


Next, I brought in the orange using the smaller of the two brushes. 


All done!


Here is how the flutes look upside down. 

What is great about this project is I completed it in less than ten minutes, and the paint won't come off with use, but washes off easily with soap and water.  This is a really simple and inexpensive way to elevate plain glass for a get-together.  

Flutes, $1 each at The Dollar Tree
Paints, $0.69 each at Walmart

To see these glasses featured in my Spring into Summer Tablescape, visit the post on my blog Parsimonious Décor Darling by clicking here.


If you enjoy this post, please visit the archives!  You may also visit my full profile to view my other blogs. Connect with me on my Facebook Page, Parsimonious Décor Darling.   You might like to visit my other blog hubs,

The Marvelous Maison, a lifestyle blog hub and 
Frugal Fab Fashionista, my fashion blog hub. 

Follow me on Pinterest!!  Please be sure to kindly follow the board guidelines, as it takes time and effort to find fabulous pins across the Internet and Pinterest!  Thank you!  

Thank you for stopping by! ❤


Saturday, April 12, 2014

Easy-Peasy Lavender Door Hangers

Hello, friends!!  Thank you for stopping by!

Today's post will feature very simple door hangers that are fragrant and elegant, and will keep for several months. 

You will need:

Freshly trimmed English lavender 
Freshly trimmed Spanish lavender 
Rustic twine such as hemp thread
Burlap ribbon or rustic fabric
Wired ribbon of your choice 
Hot glue gun and glue sticks

I began by meandering around my garden.  My English lavender aren't grown in fully yet, boo-hoo...I'd prefer to use all English lavender because of the long, elegant stems.


My Spanish lavender were pretty full, so I decided to combine the two.  


I trimmed some of the English, and more of the Spanish. As you trim, it really brings to life the delicious fragrance of these wonderful herbs.  They smell just incredible!  


Before you bring these beauties indoors, I suggest you shake vigorously!  Ants and other little buggers love these plants.  Isn't this lovely?

Next, I separated the florals into two bunches.


Align. 


Trim so the stems are symmetrical. 


Next, tie a bit of hemp thread around the bunch.  Leave a little excess hanging.  Wrap the thread around several times, binding it, and tie down using the excess thread you left from before.


Next, thread another small strand of the hemp thread through the binding you just created.


Tie in a knot, creating a loop.


Move your loop around so that the tied portion is next to the binding, this way it will be hidden.


Next, set your bunch on top of your burlap ribbon or rustic fabric. 


Glue down, then wrap around,


and glue down again. 


Press down to complete the closure. 


All complete!  Now, just hang on your door with the hemp thread loop you created.  If you like a rustic look, leave as is.


What is good about lavender is the scent is just as lovely fresh or dried, so these can last through the summer. 


Here are couple of closeups.


If you prefer, once hung, adorn your hanger with a ribbon bow made of wired ribbon.  Shown here.


To see these featured in my Spring into Summer décor, please visit the post on my blog Parsimonious Décor Darling here.


If you enjoy this post, please visit the archives!  You may also visit my full profile to view my other blogs. Connect with me on my Facebook Page, Parsimonious Décor Darling.   You might like to visit my other blog hubs,


The Marvelous Maison, a lifestyle blog hub and 
Frugal Fab Fashionista, my fashion blog hub. 

Follow me on Pinterest!!  Please be sure to kindly follow the board guidelines, as it takes time and effort to find fabulous pins across the Internet and Pinterest!  Thank you!  

Thank you for stopping by! ❤


Wednesday, April 9, 2014

Peter Cottontail Ornaments

Here comes Peter Cottontail, hopping down the bunny trail.....hippity hoppity, happy Easter day!  Ahhh, those popular words sang by the late Gene Autry.  Does anyone else remember that song?  My mother would sing that song to us when we were little.  It's been such a long time since I've heard those fun childhood lyrics sung to me, but that song still resonates with me today.  It stirs up nostalgia, and makes me miss the carefree joy childhood brings.  Today's post, a tutorial for a simple ornament, was inspired by those lyrics.  I hope you enjoy.  

You will need:
Small rabbit ornaments
Curling ribbon
Tiny cotton balls
Hot glue gun and glue sticks


First, add a small cottonball right on the pre-existing tail of the ornament.


So cute!


Since the ornaments I used were actually salt and pepper shakers, the number of holes on each didn't match.  The salt shaker had two holes, whereas the pepper had three.  I decided to cover the third holes with a small pre-made bow which double as cutesy bunny whiskers.  I glued a bow right below the "eyes" of my bunny on the salt shaker.  For the pepper shakers, I beaded a small bit of glue right into the third hole. 

Place bow. 

Bead a small dot where the bow is tied on each so they don't become loose.

All set!  This is a very simple upgrade you can give an inexpensive ornament to make them a little fun!


To see these ornaments featured in my Tablescape for Easter 2014, visit the post on my blog Parsimonious Décor Darling by clicking here.

All items in this post, The 99¢ Store


If you enjoy this post, please visit the archives!  You may also visit my full profile to view my other blogs. Connect with me on my Facebook Page, Parsimonious Décor Darling.   You might like to visit my other blog hubs,

The Marvelous Maison, a lifestyle blog hub and 
Frugal Fab Fashionista, my fashion blog hub. 

Follow me on Pinterest!!  Please be sure to kindly follow the board guidelines, as it takes time and effort to find fabulous pins across the Internet and Pinterest!  Thank you!  

Thank you for stopping by! ❤


Sunday, April 6, 2014

Mini Easter Egg Topiary Tree Place Settings


Hello, friends!  Thank you so much for coming to visit my blog!  In just a couple of weeks, it will be Easter, such a wonderful holiday!

As I began planning my tablescape this year, I wanted to do something completely fun and whimsical, which is a departure from my table for last year's Easter celebration.  Today's post will feature how to make Easter-themed topiary trees.  These may be used as décor, or as name-place settings.  I hope you enjoy. 

You will need:
Mini foam eggs
Spanish moss
Hot glue gun and glue sticks
Pre-made mini topiary trees


Begin with pre-made mini topiary trees.  You may view the tutorial in my archives by clicking here.  Follow directions, but you may opt to omit painting the treetops. 

Next, hot-glue mini eggs onto your tree in a spread-out sporadic fashion. 


Once you have glued down your eggs, bead glue in between them.  Add moss.  I used a toothpick to hold down until the glue cooled (also a good way to prevent burns).

Trim away any errant flyaways.  


All set!


To see these trees featured in this year's Easter Tablescape, visit the post on my blog Parsimonious Décor Darling by clicking here.

Eggs and moss, The Dollar Tree


If you enjoy this post, please visit the archives!  You may also visit my full profile to view my other blogs. Connect with me on my Facebook Page, Parsimonious Décor Darling.   You might like to visit my other blog hubs,

The Marvelous Maison, a lifestyle blog hub and 
Frugal Fab Fashionista, my fashion blog hub. 

Follow me on Pinterest!!  Please be sure to kindly follow the board guidelines, as it takes time and effort to find fabulous pins across the Internet and Pinterest!  Thank you!  

Thank you for stopping by! ❤