Translate

Thursday, October 1, 2015

Festive Fall Topiary Door Hangers


Is fall in full-swing where you live?  We just beginning to see signs it may arrive here in California! 

In anticipation of the changing season, I thought, why not try an upgraded version of an old one for Autumn?  One of the first pins I found when I initially opened my account on Pinterest came from the blog In My Own Style.  In the post, blogger Diane Henkler introduced a very simple way to create wonderful decorative Christmas sprays for her outdoor lanterns by using floral foam and a wire hanger.  So incredibly clever.  You may visit her post here

In today's post, I am utilizing that simple idea to create festive topiary door hangers with harvest baskets.  I hope you enjoy the post! 

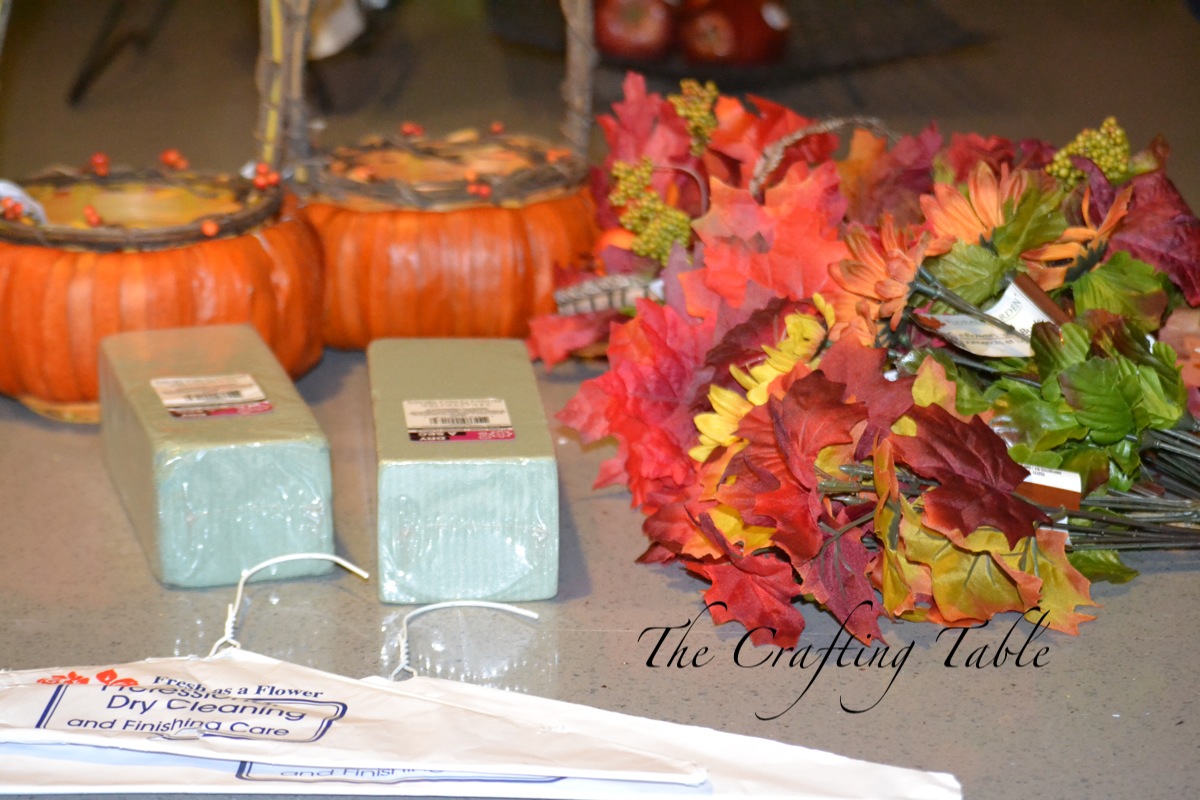
To make two door topiaries, you will need:

Two wire hangers
Two baskets
Two floral foam blocks
Hemp twine
Ribbon
Hot glue gun and glue sticks
Wire cutters or floral tool
Foam pumpkins


Begin by removing any paper from your wire hanger.  Stretch the hanger length-wise.


Manipulate the wire of the hanger


so that it just fits around the floral arranging foam, and tie down with the hemp thread.


To add my hanging baskets, I used a roll of medium-width ribbon, approximately one inch wide.


I loved the sparkle and subtle pattern of the ribbon.


Measure two equal strips of ribbon for your door hangers.


Thread the ribbon through the bottom of your folded hanger,


through the top of the basket,
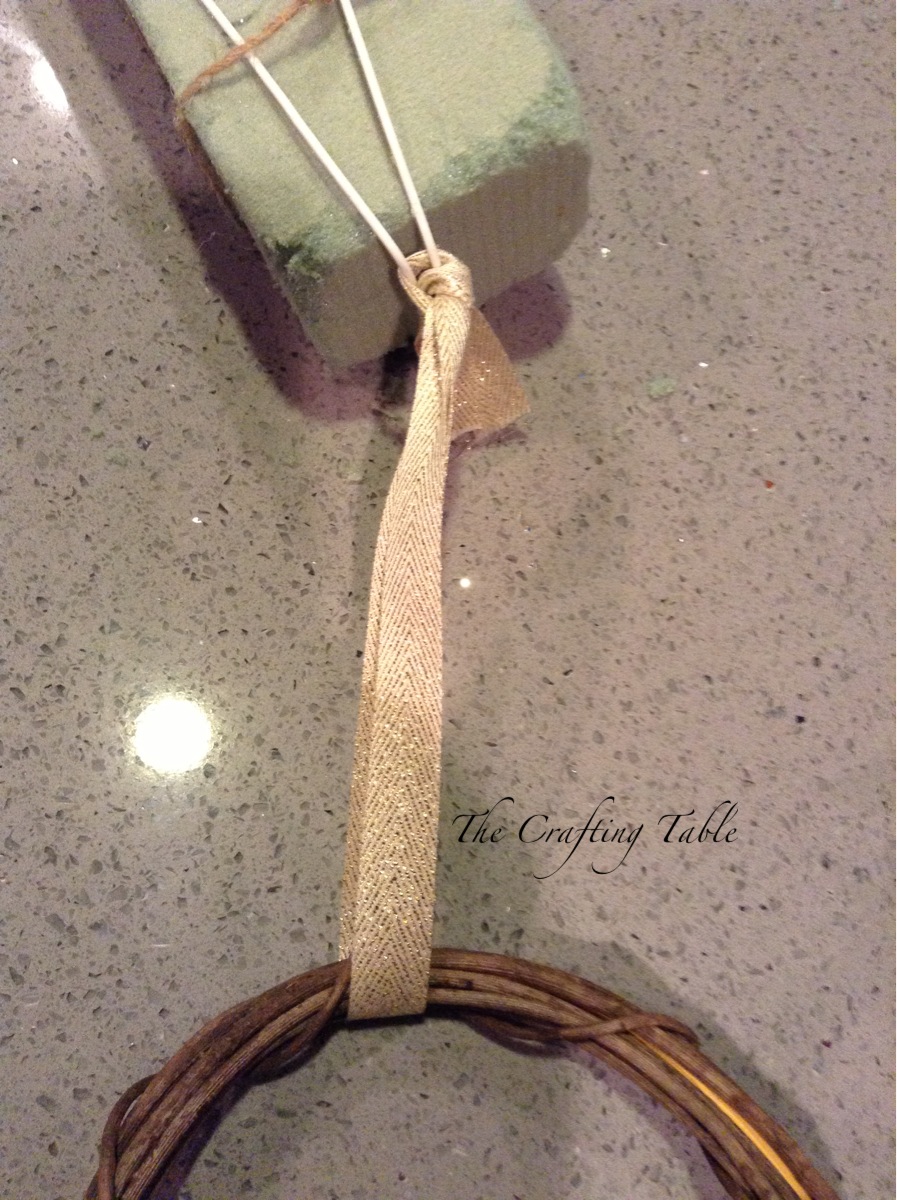


tie and glue down with hot glue.


Use the wire cutters to remove the foliage,


reserving two fuller foliage sprays and setting them aside for later.


I found that hanging the topiaries from the cabinets in my kitchen


as I added all the elements worked wonders.


Continue to fill in until a full, rounded ball forms


To add a little bit of harvest charm, I cut two of the stems from the leftover trimmed foliage


shown here,


and gently pushed it into the foam pumpkin,


and into the foam at the top of my hanger.


On the very tip-top of the basket, I used a pretty plaid pattern ribbon


and tied it into a double bow. Use hot glue to hold in place.


Almost there.....place the two reserved foliage sprays just inside your baskets.


Fluff and rearrange the foliage where you see any gaps.


Finally, here is a look at the hangers on my front doors.


Very festive, fun, and easy too!


To see these featured in my post with the rest of my Fall décor for 2015, you may visit the post on my blog Parsimonious Décor Darling by clicking here.


Where to buy:

Thin ribbon, fuller floral sprays, and baskets, Michael's Crafts
All other floral, foam pumpkins, plaid ribbon, foam blocks, and hemp thread, The Dollar Tree


If you enjoy this post, please visit the archives!  You may also visit my full profile to view my other blogs. Connect with me on my Facebook Page, Parsimonious Décor Darling.   You might like to visit my other blog hubs,


The Marvelous Maison, a lifestyle blog hub and 
Frugal Fab Fashionista, my fashion blog hub. 

Follow me on Pinterest!!  Please be sure to kindly follow the board guidelines, as it takes time and effort to find fabulous pins across the Internet and Pinterest!  Thank you!  

Thank you for stopping by! ❤


Tuesday, June 2, 2015

No-Sew Denim Rag Coasters Or Placemats


Are you a fan of retro?  Pure Americana?  Well, I certainly am!  One thing that's almost as American as apple pie is denim jeans.  Pairing a plain white T-shirt with an iconic pair Levi's or other denim is a staple of American fashion that likely will never go out of style.  For this year's Independence Day, I thought I'd pay tribute to simpler times with denim rag coasters.  You can also use this method to make placemats.  Slightly imperfect, they remind me of the fabric of our country, also bound with its imperfections, yet when we work together, we become much stronger as one (corny, I know, I know....but I am a huge sentimental softie).  

You will need:

Denim of varying colors
Heavy-duty double-sided tape
Large denim iron-on patches
Scissors
Ruler or straight edge, if so desired
Iron


Cut your denim into strips approximately 1-inch wide,  6-inch long strips for coasters, or 1-inch wide, 14-inch long strips for placemats.    I usually donate all my kiddos' outgrown jeans to Goodwill twice per year, but this past December, I saved a couple pairs.  You can use old jeans, which I prefer because of the worn, washed look, or you can use new denim.  If you want a refined, more streamlined effect, use the ruler to carefully measure and cut each piece.  I wanted a country-prim look for mine; I just snipped away without measuring.....so the imperfections were a plus for me!


Weave the pieces together in a simple basket-weave pattern, and attach the undersides with double-sided tape.  Trim any major frays.


Lay the coasters onto the sticky side of your iron-on patches, and iron them.  I used these extra-large patch iron-ons from Walmart.


 Trim away any excess.


All set!


On my plate.


To see these featured in my 2015 Independence Day Tablescape, please visit the post on my blog Parsimonious Décor Darling here.


Thank you for stopping in!  :)


If you enjoy this post, please visit the archives!  You may also visit my full profile to view my other blogs. Connect with me on my Facebook Page, Parsimonious Décor Darling.   You might like to visit my other blog hubs,


The Marvelous Maison, a lifestyle blog hub and 
Frugal Fab Fashionista, my fashion blog hub. 

Follow me on Pinterest!!  Please be sure to kindly follow the board guidelines, as it takes time and effort to find fabulous pins across the Internet and Pinterest!  Thank you!  

Thank you for stopping by! ❤


.


Saturday, May 16, 2015

Simple Patriotic Garden Hat Hangers

Hello, and thank you for stopping by today!  I can't believe it is again almost Summer!  The days certainly fly by rapidly!  Summer typically means outdoor BBQs, fun in the sun, and great weather.  It is also the time that we celebrate our country's independence, and just prior to that, we pay respect to our fallen for Memorial Day.  Today's tutorial are simple patriotic hat hangers that are interchangeable whether you are celebrating the 4th of July or Memorial Day.  I hope you enjoy the post!

For two hangers, you will need:

Two garden sun hats
Faux flowers of red, white, and blue
Four mini flags
Two patriotic bows
Elastic
Stapler
Staple remover
Ribbon


I began by adding a patriotic ribbon to my hats.  Each of these ribbons has a pliable twist-tie, so I simply threaded it through the hat and twisted it onto itself.


Shown here.  I didn't bother to remove the original ribbon, because I sort of enjoyed the layering of the ribbon, and I'm sure I will reuse them sometime in the future.


I starched and ironed the mini flags so that they would lay flat.


Each of these flags were constructed with tiny staples and a small wooden dowel.


Using a staple remover, I removed the staples on two of the flags.  I flipped them over, and reattached them.  Now, instead of four flags facing all the same direction, I have two that face left and two that face right.


I used elastic to attach each flag.  I threaded the elastic through the hat,


tied it on the backside,


and slipped each dowel through the loops I created.


Next, I clipped one stem of red, white, and blue for each hat, and carefully threaded it through the wicker of the hat.
 

Finally, a small bit of red ribbon was threaded though the very top of the hat to use as a hanger.


Completed hangers.


Left.


Right.


I opted not to use any hot glue or anything permanent....making it easy to disassemble for use in the future.  This project was cost-efficient too, each hanger cost less than $15!!!  ;)

Where to buy:

Garden hats, local nursery
Floral stems, Hobby Lobby
Patriotic bows, Big Lots
Mini Flags and Ribbon, The Dollar Tree

To see these featured in my entryway décor for 2015, please visit the post on my blog Parsimonious Décor Darling by clicking here.


If you enjoy this post, please visit the archives!  You may also visit my full profile to view my other blogs. Connect with me on my Facebook Page, Parsimonious Décor Darling.   You might like to visit my other blog hubs,

The Marvelous Maison, a lifestyle blog hub and 
Frugal Fab Fashionista, my fashion blog hub. 

Follow me on Pinterest!!  Please be sure to kindly follow the board guidelines, as it takes time and effort to find fabulous pins across the Internet and Pinterest!  Thank you!  

Thank you for stopping by! ❤