
Halloween is that time of year grown-ups and children alike take to neighborhood streets in search of fun, frights, and treats. No matter if you are a gothic goddess planning an event or a mommy who wants a fancier version of Halloween invitation, I hope you find this tutorial appealing. The cost to make these is approximately $3.00 per invitation.
You will need:
Black paper jewelry box with window. I bought mine at the 99¢ store, and it included jewelry.
Red cardstock or construction paper.
Black lace, fishnet, or plain nylons
Thin red ribbon
Cameos
Exacto Knife
Exacto Knife
Hot glue gun
Glue sticks
First, remove the jewelry. Use the inner paper where the jewelry was displayed to create a template by placing it upside down onto your cardstock. Cut along the paper innards with the Exacto.

Cut the cardstock all the way across until you have one long strip.

Place the paper insert upside down onto your cardstock.

With the Exacto, poke a small hole in the paper to use as a reference point.

Using that tiny dot as a guide, place your paper insert to the right of it and cut along the insert.


You should now have a card the same size as your paper insert.

Put hot glue on the paper insert. Place the card onto the surface.

Lightly rub, then flip over and press down firmly.
Squeeze a bead of glue along the edges of the paper insert. Place into the jewelry box and press down.


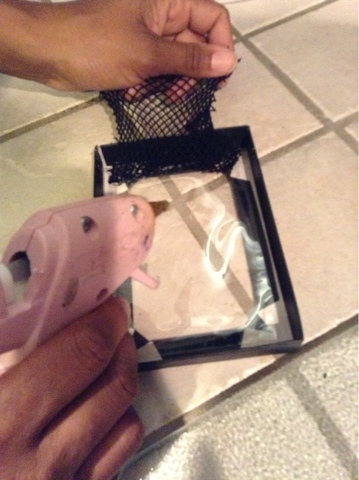
Next, place the whole box into your nylon, and cut along the edges. Be sure to leave a tiny bit extra.


Place your nylon onto the glue. Careful! Hot. Allow to cool.

One side at a time, repeat the process. I used the blunt end of my Exacto so I didn't have to touch the hot glue.

Cut the cardstock all the way across until you have one long strip.
Place the paper insert upside down onto your cardstock.
With the Exacto, poke a small hole in the paper to use as a reference point.
Using that tiny dot as a guide, place your paper insert to the right of it and cut along the insert.
You should now have a card the same size as your paper insert.
Put hot glue on the paper insert. Place the card onto the surface.


Squeeze a bead of glue along the edges of the paper insert. Place into the jewelry box and press down.
Now, flip over and squeeze a bead of glue onto one side of the inside of the jewelry box top.
Place your nylon onto the glue. Careful! Hot. Allow to cool.


Thread the cameo with the ribbon.

Squeeze a thin bead of glue onto the outside of the box. Do so sparingly: it is only for the ribbon.

Place ribbon onto glue. Once cool, repeat, pulling ribbon across the corner of the box in a diagonal fashion.

Flip the boxtop over and glue the ribbons down,

and trim the excess.

Repeat the process on the lower part of your box.


Your box is complete!!

Next, insert a card or print one from your computer outlining the details of your event (mine was by hand, please excuse the writing). Glue it to the inside of your card.


All done!
If you enjoy this post, please visit the archives! You may also visit my full profile to view my other blogs. Connect with me on my Facebook Page, Parsimonious Décor Darling. You might like to visit my other blog hubs,
The Marvelous Maison, a lifestyle blog hub and
Frugal Fab Fashionista, my fashion blog hub.
Follow me on Pinterest!! Please be sure to kindly follow the board guidelines, as it takes time and effort to find fabulous pins across the Internet and Pinterest! Thank you!
Thank you for stopping by! ❤
No comments:
Post a Comment