
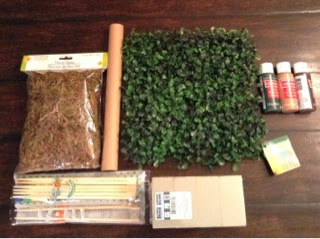
For a large topiary tree you will need:
Small cups (Dixie-cup size)
Chopsticks or wooden dowel
Styrofoam balls
Green, tan, and brown paint
Floral moss
Floral arranging foam
Floral arranging beads or stones
1 faux grass mat
For a small topiary tree you will need:
A tiny paper roll
Chopsticks or wooden dowel
Styrofoam balls
Floral moss
Green, tan, and brown paint
Floral arranging foam
Where to buy:
Chopsticks, The 99¢ Store
Grass Mat, The 99¢ Store
Floral moss, The Dollar Tree
Mini cups, The Dollar Tree
Floral foam, The Dollar Tree
Paints, Michael's Crafts, $1.50 each
First step: Paint all of your styrofoam balls green. I chose a very dark forest green. I used medium (golf-ball sized) balls for the larger trees, and smaller (large gumball sized) for the smaller trees.

Set aside to dry.

Next, separate and paint your chopsticks brown.


Once dry, I measured approximately 4 3/4 down the chopstick and made a notch using an Exacto.


Using a knife with a serrated edge, saw the chopstick where you made the notch.

Repeat process to remove the square bottoms of the chopsticks. Set aside.

Paint a small cup inside and out for each large tree with the tan color. I painted two coats; paint until the color is opaque. Set aside.


Paint your paper roll with the same tan color.

Once dried, I measured at approximately one and one-half inch intervals and marked.


Draw around the roll.

Cut out with the Exacto.


I created a bottom for each by first disassembling a cup.


Bead glue onto the rim of your little tube.

Place onto the disassembled cup.

Trim. You now have a mini pot. Repeat until you have the desired amount. Set aside.

Using an apple corer, I cut several cylinders out of the floral foam, one for each of the small trees.


Use an Exacto to trim to size by placing the cylinder into your little pot as a form of measure.

Bead glue onto the bottom of your cylinder,

and place into your mini cup.

Bead glue onto the blunt end of one of the pointy chopstick halves.

Gently push into your foam.

Once cool, gently push the pointy side into one of the smaller pre-painted styrofoam balls.

Next, bead glue into your mini "pot."

Add floral moss and arrange so that there are no visible gaps or foam. Your mini tree is complete! Set aside.

Cut your floral foam into several small blocks, one for each of your large trees.


Bead glue into your mini "pot."

Place the foam block right inside to create a foundation.

Gently push a chopstick into the foam and remove to make a hole. Set these aside.

To create the treetops, first disassemble your faux grass mat.

What is great about these is that each little piece has a flat platform from which the leaves spring, making it very simple to glue down.

Bead glue onto one of your larger balls,

and place the leaf platforms. Continue to build and cover the ball. I used a toothpick to hold the little platforms in place about ten seconds each to allow cooling time.


Continue this process until your ball is almost completely covered.

On one side, leave a small gap.

Where you have left a gap, push in and remove your chopstick half.

Bead glue into the hole you've just made,

and place the chopstick half inside, holding until cool.

You can now add to your pot. Where you previously made a hole in the foam, bead glue. Place the chopstick into the hole, and hold into place until cool. Add a few beads inside until the tree is able to stand upright without teetering.

Bead glue into your mini pot, and arrange the floral moss, covering any visible areas. All set!!


To see these trees featured in this Tablescape, posted in the springtime of 2014, please visit the post on my other blog Parsimonious Décor Darling by clicking here.

If you'd like to see the trees featured in my Christmas Tablescape for 2014, you may visit the post on my other blog here.
If you enjoy this post, please visit the archives! You may also visit my full profile to view my other blogs. Connect with me on my Facebook Page, Parsimonious Décor Darling. You might like to visit my other blog hubs,
The Marvelous Maison, a lifestyle blog hub and
Frugal Fab Fashionista, my fashion blog hub.
Follow me on Pinterest!! Please be sure to kindly follow the board guidelines, as it takes time and effort to find fabulous pins across the Internet and Pinterest! Thank you!
Thank you for stopping by! ❤
Great tutorial. Pinning.
ReplyDeleteThank you very much, Laurie!
Delete